Showing posts with label DIY. Show all posts

Monday, 19 April 2010

Rental Renos 2 - Adding more Colour and Pattern

Section 2 of my suggestions on perking up your rental home without investing money into things you can't take to your next place!

Here are a couple more ideas to add colour and pattern to a bland space.

Paint something up in bright stripes - a canvas, sheet of fabric, large sheet of paper or board.

I did the canvas below when we first moved in to brighten up the hall, and just blue tacked (yes, I couldn't live without the stuff) the rabbit mask on afterwards as a second thought.

I stress that this is NOT a painting...but merely a bunch of stripes on a canvas...painting snob that I am! Super easy to do for anyone, not just artists or the craftily-inclined. Just mock up the colours you want by playing in photoshop or using strips of coloured paper and moving them around until you get a combination you like, then tape up the canvas into varying size stripes, mix the paints and go. Done in a few hours.

Suggestion- if using masking tape and acrylic paints make sure you take the tape off BEFORE it dries, or you will peel away paint with tape! (have done this before, and it sucks)

A much quicker fix would be to take boldly patterned fabric, a la Marimekko (they have been selling their fabrics stretched on canvases as 'art' for ages), and just stretch it on a canvas frame.


Maybe a chevron print?
Here is an example of a Marimekko print used to great effect:
Another idea is to cover a board or card with pattern and slide it into place.
I had mocked up this foamcore 'table top' for an ikea tv stand I hacked into a entry table when we first moved in, and when I replaced it with an mdf top discovered that it was the perfect width to tuck into this space under the bathroom cabinet as a temporary hit of colour in the bathroom.

As you can see from detail below, it is covered with cheap wrapping paper from Paperchase at the moment, and will not survive in the humidity, but for the moment, it is adding some much needed punch to our taupe-ly drab bathroom.
Here is another shot , demonstrating the old adage of making the most of boldly printed textiles!
I made these curtains out of bargain priced fabric from Ikea and edged it in black (with blackout liner). I love the oversize print on these and found another image of someone using the fabric for curtains as well, but without a liner and edging they look much different:
Here is an interesting idea from Sibella Court that would be easy to do. Looks like she has cut up a bunch of paper 'scales' and attached them to a wall.
Or what about bluetacking a bunch of book pages to a wall as wallpaper? I have seen this done really loosely with flapping edges and overlapping pages and it looks lovely.
Have a collection of old photographs? How about a photo wall like the one at Bluebird on Kings Road?
Here is a glamourous idea from the owner of VV Rouleaux, an amazing trimings store in Marylebone.
You would have to have a good wad of money to do this one, but if you could afford the crystals, a length of moulding and some screw in hooks...fabulous!

Thursday, 15 April 2010

Vintage Tray Joy

Uh oh. I think I am becoming an ebay addict.

Won this metal tray today, though, and it is causing me much joy...

Yesterday I impulse purchased a series of jewel-like postcards of collages by John Murphy that he has done for Habitat (£3.50 for 10 and worth every penny!).

They are in a similar style to the image below:
I plan to attach one of my favourites to the metal tray with some cool, wooden, animal-shaped magnets, also from Habitat (it was a chance find whilst picking up things for work! Oops.).

I may even win another vintage tray in a few days that I am bidding on, and then I can have them both side by side on a wall. Oooh. Joy. Fingers crossed.

Think they will have a similar 'feel' to these yummy trays  by cool french design company ibride that I have been covetting for months, which you can get at Lifestyle Bazaar in Soho and Shoreditch, but just can't justify spending that much money on at the moment.

Here are a few:
What a gorgeous shot:
As I was checking their beautiful website for photos, I saw these Volubilis stacking stools, which are not just elegantly styled, but stack into a sculptural shape (the woman is sitting on a stack).
Also chanced on these miniatures of their larger tables. Wonder how much these sweet babies are? They would be such unique plinths for little treasures on a shelf or table.
I can't resist adding this shot of the 'Bambi' chest of drawers.

Also this one, the 'Diva' console. One of my favourites.
Their 'alice in wonderland' themed advertising photos are wonderfully whimsical and show their cheeky designs off.

I will try to remember to post an image of the final postcard/tray project when they are done!

Rental Renos

For many of us in London, living in rental accommodation presents interesting design challenges. Saddled with ugly, cheap ikea furniture in furnished flats, and boringly bland spaces like bathrooms and kitchens which are notoriously difficult to 'dress up' without physically changing fittings, tiles etc., many of us struggle to personalise the spaces whilst trying not to spend money on things we can't take away with us to the next flat.

I thought I would do a post looking at a few ideas on how to have the rooms you want, without breaking rental rules!

The first idea I love is the invention of tile stickers - vinyl stickers for tiles which can be removed. These are a great idea and long overdue.

These ones by at  Lotta Kühlhorn Retro Etc. are amazing:
 Even one stripe would make a huge difference to a space.
A bit tough figuring out where she is selling them though, but if you contact Retro Etc. in Sweden, they should be able to let you know.

Unfortunately our boring, beige tiles are textured, so we can't use these. Sigh.

This next idea is a wacky one of mine...though surely SOMEONE must have come up with it as well:

Blue tacking wallpaper!

I have done this in a few flats now, and it works really well. I just hang the wallpaper from pins or nails at the very top and then you just have to have the patience to tack all the edges down with blue tack.

It is not seemless, as you can see the shadow of the edges in places, but I think it works well enough, and lets you indulge in being able to use wallpaper in a rental without losing your deposit. Also, you can take the paper with you when you leave and reuse it elsewhere.

This was the first time I tried it. One Habitat roll for £30 and a world of difference to a room (sorry for the lacklustre picture, it is the only one I could find):
The following is my most recent go - prefaced by the comment that the bedside tables are the landlords and will soon be in the closet, as their ugliness offends me (!):

...and because I love the 'before and after' format so much...

snoringly boring before

ice queen wonderland after
A world of difference.

I suggest using a pattern, with vertical emphasis for example, which doesn't show the unpasted joins in the paper as much.

I have some more projects/suggestions and will be posting them soon...

Wednesday, 14 April 2010

Twinkle Twinkle

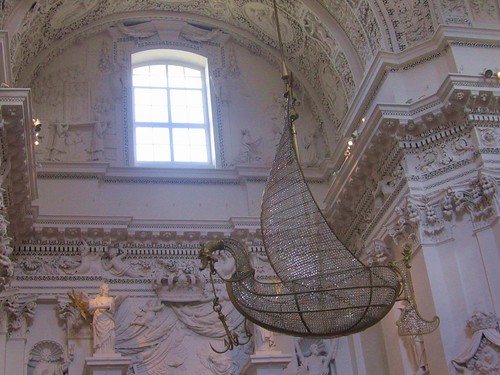
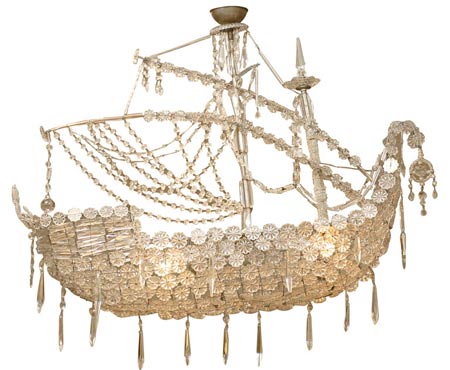
In my madness, am seriously considering how long it would take to put together a ship chandelier. I have been seeing ones cropping up for months and am always entranced by how magical they look in a room.

Zgallerie makes these ones for $799 in  California, which is a bit rich for my blood:
Close this window

 They do look lovely in a room though.
https://blogger.googleusercontent.com/img/b/R29vZ2xl/AVvXsEiEpv82OtN1aZnbmsCZ6AvRihmjDG1ztbkp4QJYReV5p1DR9L0OkrsLuLqGQgdW9sbtk_9vG6SQOj7xCCzCX6HyCSNLKMTNoEt4QzRVr0jr0vTnVXkphshAXMlexg8Mn7x3smRNLfdMiI2v/s400/crystal+ship+chandelier.jpg

Looks like they might have modeled it off of this antique one for $2000! Eek.

Here is a gorgeous antique Celtic one. Anchor and rudder are a great touch:
http://farm1.static.flickr.com/30/36562177_97102ca672.jpg

The next one is listed on 1stdibs with no price. Would hate to see how much it is going for. Listed as early 1890s.
http://elitechoice.org/wp-content/uploads/2008/03/crystal_chandelier.jpg

Amazingly, they have some very detailed shots of the wirework and it looks even simpler than I'd thought.
downloading...

Looks like there is only a simple wire frame and the crystals are attached with a thinner, handwoven wire web. Much easier than soldering every join. Hmmm...A solder iron, some wire, TONS of crystals and a few months should probably do it, non? (no, I am NOT kidding! Figure it would be like making jewellery, only on a much larger scale.). The only thing I would really need, which I don't have, is patience!

I want the celtic looking one with the dragon's head, though. Dragon's head. Must be able to find one somewhere I can modify.
Then I started thinking 'Ok, if not a ship, then what? What other forms would be interesting?' ...and of course someone has already gone there!

Check THIS OUT! By a company called Rock and Royal in Rotterdam:
royals chandeliers

The artist, Hans van Bentem, will make anything you want, as evidenced by the below 'meat and two veg' chandelier. Now I am all for a good laugh, but not sure I would want this one hanging over my dining room table!

A few more - these umbrellas are quite whimsical.

Oh, so very tempting. Only thing is what would I make...and where would I put it?

Will this be one of those failed attempts at wonderous madness? Must roost and think!

Tuesday, 6 April 2010

Museum Shops Online???? Uh Oh

I suppose it is comforting to know that I am not the only one who enjoys a good rummage in a museum or gallery gift shop!

Culture Label has collected the cream of the shops from over 70 museums and galleries from around the world all online for gift shops freaks like me!

I am a little nervous to delve more deeply into their trove of wares, as I just clicked into the site and have already spotted these owl handpuppets by Alice Melvin that are a hoot (ahem).

Check out the fab patterns that come with the book. It looks like they are printed on fabric and you just cut and sew.
What would I do with a hand puppet, you ask??? I am sure there would be hours of fun in chasing Bubby around the house with one...don't you think?

Anyway, back to browsing the goods.

Wednesday, 31 March 2010

Chair After

Always a sucker for 'before and after' segments in other blogs, here is the first of many.

Below is a refresher of what the chair looked like 'before' with it's tatty pleather seat and wobbly joints:


Here are the 'after' photos of the chair newly glued and with it's new peacock linen seat. Having a bit of a swing off the back of the chair is my mate Finbarr (as per a friend's suggestion that I include more of them in my photos!)


I am still undecided about leaving the plywood of the chair back exposed, as it isn't the nicest ply and looks a bit cheap, but think I will leave it for now, as is.

Tuesday, 30 March 2010

Seaside Charity

Whilst trolling the charity shops on my seaside excursion this weekend, I found a few great things that will keep the projects going for a while.

The  most exciting find was this chair for a fiver, and the gorgeous peacock linen fabric that I am going to recover the seat in! Needs a bit of glue as the joints are loose, but in pretty good nick.

Waffling a bit about whether or not I will cover the back of the chair as well, as it is only plywood, with a bit of damage on one corner. Think I will wait and see what it looks like when the seat is done.

Got to love a deal.